Working with TinaCMS
Open your project locally and in the env.local file set:
NEXT_PUBLIC_USE_LOCAL_CLIENTto0.NEXT_PUBLIC_TINA_CLIENT_IDto the Client ID copied from an earlier step and found in your app's Overview section.
Restart your server and run yarn dev again.
To edit the site, navigate to http://localhost:3000/admin. This activates the edit mode.
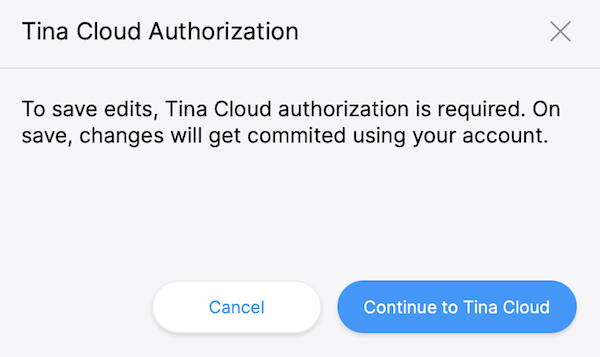
This time a modal asks you to authenticate through TinaCMS. Upon success, Tina will send your edits to the TinaCMS server, and subsequently to GitHub.
To enter edit mode, navigate to the
adminroute of the site.
Edit content
Make some edits through the sidebar and click save. Changes are saved in your GitHub repository.
Now that Tina Cloud editing is working correctly, we can deploy the site so that other team members can make edits too.

ℹ️ Gotcha: since your changes are being synced directly to Github, you'll notice that when you're in non-"edit" mode your page still receives the unedited data from your local file system. This is mostly fine since editing with Tina Cloud is designed for hosted environments. But beware that changes to your schema may result in a mismatch between the Tina Cloud API and your local client.
Deploy
Vercel
Connect to your GitHub repository and set the same environment variables as the ones in your env.local file:
NEXT_PUBLIC_TINA_CLIENT_ID= <YOUR_CLIENT_ID>
NEXT_PUBLIC_USE_LOCAL_CLIENT=0
Add the deployment URL to your app's Site Urls. To do this, go to your app's Configuration page.
🎉 Congratulations, your site is now live!
You can test that everything is configured correctly by navigating to [your deployment URL]/, navigating to the admin route,
log in to TinaCMS, and start making some edits. Your changes should be saved to your GitHub repository.
Netlify

Connect to your GitHub repository, click on advanced to set the same environment variables as the ones in your env.local file:
NEXT_PUBLIC_TINA_CLIENT_ID= <YOUR_CLIENT_ID>
NEXT_PUBLIC_USE_LOCAL_CLIENT=0
Set the build command to yarn build,
Set the publish directory. To .next/ .
Once you're done, click "Deploy site".
Add the deployment URL to your app's Site Urls. To do this, go to your app's Configuration page.
You can test that everything is configured correctly by navigating to [your deployment URL]/, navigate to the admin route,
log in to Tina, and making some edits. Your changes should be saved to your GitHub repository.
ℹ️ Changes in edit mode show up on your home page after your site finishes a rebuild.
Last Edited: July 27, 2021